
HSC Ceramics™ Product Installation Guide
General Recommendations
We strongly recommend that all ceramic bearings and related products be installed by a qualified mechanic using proper tools.
Preparation
- Remove the old bottom bracket, bearings, or jockey wheels using the correct tools to avoid damage to the frame, hub, or derailleur cage.
Pressfit Bottom Bracket Removal Tool
Pressfit Bottom Bracket Installation Tool
Thread Bottom Bracket Removal/Installation Tool - Clean all components and remove old grease if the bike has been used previously.
- Apply a thin layer of HSC anti-creaking grease inside the bottom bracket or hub shell and on the outside of bearings or bottom bracket cups before installation.
HSC Anti-Creaking Grease
Installation Instructions
Threaded Bottom Brackets
Use the correct bottom bracket spanner for English or Italian threads. Torque should be around 40Nm.
Thread Bottom Bracket Removal/Installation Tool
Pressfit Bottom Brackets (with Cups)
Use a proper bottom bracket press tool. Ensure the correct drift size is selected for your frame and bearing size.
Pressfit Bottom Bracket Installation Tool
It is recommended to apply HSC Anti-Creaking Grease to eliminate small play, which is key to solving the pressfit bottom bracket creaking issues.
SRAM GXP Cranks
Includes a 2mm black plastic spacer and a metal wave washer:
- Only use the spacer or washer if there is play after crank installation.
- If your current setup uses a spacer/washer, replicate that configuration to eliminate play.
- Install these parts on the drive side only as needed.
Instructions for Specific Bottom Brackets
BSA DUB
- Use the correct bottom bracket spanner for English threads. Torque should be around 40Nm.
Thread Bottom Bracket Removal/Installation Tool -
The DUB bottom bracket comes with a set of spacers and wave washers. These should only be installed if needed, depending on your frame width and the installed width (the distance between the crank arms after installation).
The basic principle is the bottom bracket and spacers are used together to build the correct width for your specific DUB crankset. The positions of the spacers used are shown below. Keep in mind that you don’t need to use all the spacers, only apply them when necessary.
1. Outer spacer 1.5mm; 2. BSA bottom bracket external cup width 11mm; 3. Inner spacer 2.5mm; 4. Inner sleeve; 5. Outer Spacer 3.5mm; 6. Outer wave washer 0.5-3mm
Example setups-
Standard road crank (installed width ~90 mm)
For a 68 mm BSA frame shell, you would install the parts in the following sequence: 2 + 4 + 2 to achieve the 90 mm total width. -
Wider crank (installed width ~100 mm)
You might use spacers and the parts as follows: 1 + 2 + 3 + 4 + 3 + 2 + 5 to build the total 100 mm width.
Each bike can be slightly different, so use the provided spacers along with any existing spacers you have to achieve the correct width for your frame and crank. In most cases, the outer wave washer is not needed, it is only used when there is a small play that cannot be eliminated. Please keep in mind that overtightening the wave washer can create excessive preload on the bearings.
-
Pressfit30 / EVO386 / BBright
- Grease inside the frame shell and outside the bottom bracket cups.
HSC Anti-Creaking Grease - Comes with a 30mm ID wave washer to eliminate play (install only if needed on the drive side).
- MTB versions include 2mm 30mm ID plastic spacers — use depending on your frame/crank width combo.
BB30
- Grease inside the frame shell and outside the bearings.
HSC Anti-Creaking Grease - Follow the diagram for the correct component order.
- The wave washer goes on the non-drive side.

Pressfit30 OSBB (Shimano/SRAM)
- Grease inside the frame shell and outside the bottom bracket cups.
HSC Anti-Creaking Grease - Includes 2 x 3mm spacers for Specialized OSBB carbon shells.
- Place one spacer on each side of the bottom bracket cups before pressing them into the shell.
BB92/41
- Grease inside the frame shell and outside the bottom bracket cups.
HSC Anti-Creaking Grease - Use 1 x 2mm spacer on the drive side for a 89mm shell width.
- No spacers needed for 92mm shells.
Campagnolo Ultra Torque
- Grease inside the frame shell and outside the bearings.
HSC Anti-Creaking Grease - We supply only the ceramic bearings (2 x 6805-6mm).
- Use all other hardware from your existing bottom bracket.
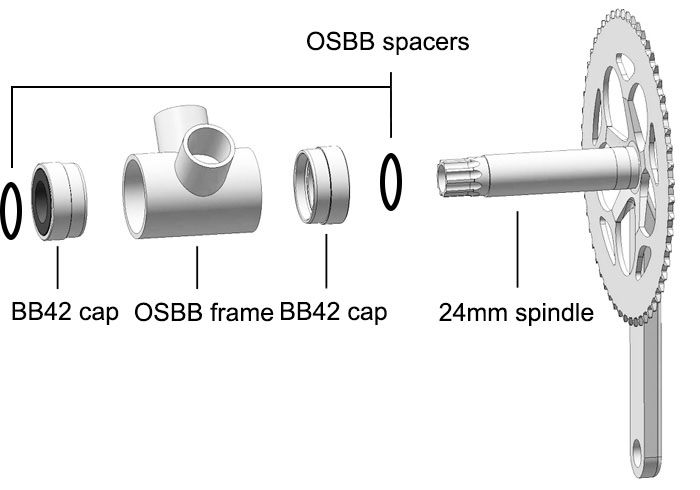
BB42
- Grease inside of the frane shell and outside of the bottom bracket caps with HSC Anti-Creaking Grease
- Install following the diagram as below.
- MTB versions include 24mm ID x 2mm spacers, use as needed based on your frame width.

BB42 (BB30 OSBB)
- Grease inside of the frame shell and outside of the bottom bracket caps with HSC Anti-Creaking Grease
- Install following the diagram below with two provided spacers in between the BB42 cap and the crankset.
Rear Derailleur Pulleys
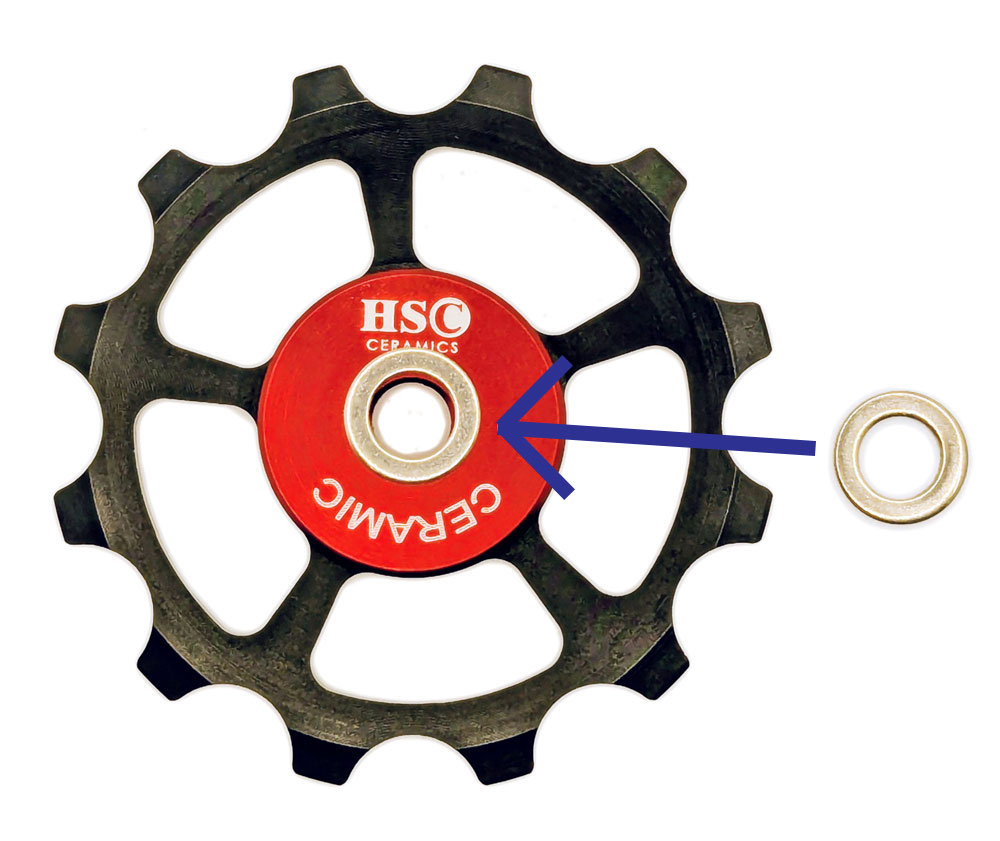
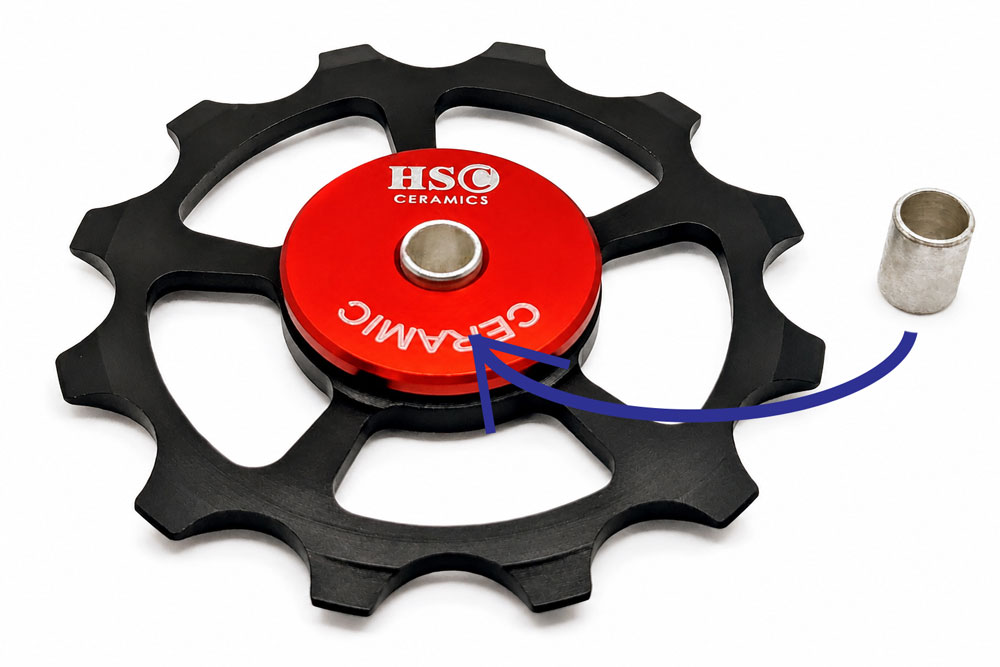
- HSC pulleys are CNC machined, and the upper and lower wheels are identical, so you can install either one in the upper or lower position.
- Pulleys are compatible with 10-speed, 11-speed, and 12-speed systems from Shimano, SRAM, and Campagnolo.
- For 10-speed Shimano and SRAM systems, spacers are required, we’ve included 4 metal spacers with your purchase (use one on each side of each pulley, positioned outside the dust cover). It can be helpful to apply a small amount of grease to the dust cover to hold the spacer in place before inserting the bolt.
- For 11-speed Shimano and SRAM systems, no spacers are required.
- For 12-speed Shimano Ultegra system, no spacers are required, however, in some cases, you may need to add 4 metal spacers. We’ve included 4 metal spacers with your purchase (use one on each side of each pulley, positioned outside the dust cover). It can be helpful to apply a small amount of grease to the dust cover to hold the spacer in place before inserting the bolt.
- For 12-speed Shimano Dura Ace system, no spacers are required
- For 12-speed Shimano 105 system, 12-speed SRAM system and 12-speed Campagnolo system, please install the pulley wheels without spacers initially, they should fit as is. However, in some cage setups, spacers may be required. We’ve included 4 metal spacers with your purchase (use one on each side of each pulley, positioned outside the dust cover). It can be helpful to apply a small amount of grease to the dust cover to hold the spacer in place before inserting the bolt.
- For 10,11,12-speed Shimano GRX (Gravel) system, please install the pulley wheels without spacers initially, they should fit as is. However, in some cage setups, spacers may be required. We’ve included 4 metal spacers with your purchase (use one on each side of each pulley, positioned outside the dust cover). It can be helpful to apply a small amount of grease to the dust cover to hold the spacer in place before inserting the bolt.
- We include a 4mm ID metal sleeve for SRAM 4mm bolts; select this option if needed.
- Our 12-tooth narrow-wide pulley wheels are directional. Please refer to the image below to ensure they are spinning in the correct direction for installation.

- No oil or grease lubrication is needed for HSC ceramic pulley wheels.
Note on Shifting Performance
If you have installed the new pulley wheels and notice that shifting is not performing as expected, please first check whether the upper guide pulley has a small amount of lateral movement (side-to-side float) once installed. This small amount of float is necessary to ensure smooth shifting, particularly for Shimano rear derailleurs.
If the upper pulley bolt is tightened too much, it may restrict this movement and negatively affect shifting performance.
As a first step, try loosening the upper pulley bolt slightly (do not loosen excessively) and test the shifting again without changing the rest of the derailleur setup. If shifting improves, you can then fine-tune the bolt tightness to achieve the best shifting performance while still allowing a small amount of lateral movement.
For installation security, it is recommended to apply a small amount of threadlocker (e.g., Loctite) to the pulley bolt threads.
Wheel Bearing Installation Guide
Follow these steps to correctly install new wheel bearings into your hub. Proper tools and careful technique will ensure long-lasting, smooth performance.
Step 1: Prepare Tools and Bearings
-
Gather your new bearings, a bearing press (or a drift that matches the bearing's outer race), and grease.
-
Make sure bearings are clean and undamaged before installation.
Step 2: Clean the Hub Shell
-
Wipe the inside of the hub shell with a clean cloth.
-
Remove any dirt, debris, or old grease to ensure a secure fit.
Step 3: Apply Grease
-
Lightly grease the bearing seats inside the hub shell.
-
This helps ease installation and reduces friction and corrosion.
Step 4: Position the Bearings
-
Align the new bearing squarely with the hub shell opening.
-
Ensure it is properly centred before pressing.
Step 5: Press the Bearings In
-
Use a bearing press or a soft mallet with a matching drift to press the bearing into place.
-
Only apply pressure to the bearing outer race; pressing the inner race may damage the bearing.
-
Apply slow, even pressure to avoid misalignment.
-
Insert the axle carefully through the bearings.
-
It should slide smoothly without any force.
-
Secure the end caps back onto the hub.
-
Check that everything is seated correctly and there is no play.
Step 8: Test the Hub
-
Rotate the hub by hand.
-
It should spin freely and smoothly, with no unusual resistance or noise.
If you have any questions about installation or products, please contact us at [email protected].